OpenFaaS Dashboard
The OpenFaaS Dashboard is a new UI, rebuilt to make operating and understanding OpenFaaS easier.
Note: This feature is included for OpenFaaS Standard & For Enterprises customers.
Using the dashboard
For shared clusters, we recommend using IAM for OpenFaaS with Single Sign-On (SSO) to authenticate to the dashboard.
For single-user clusters, you can use your browser or a product such as 1Password to save your credentials for each installation.
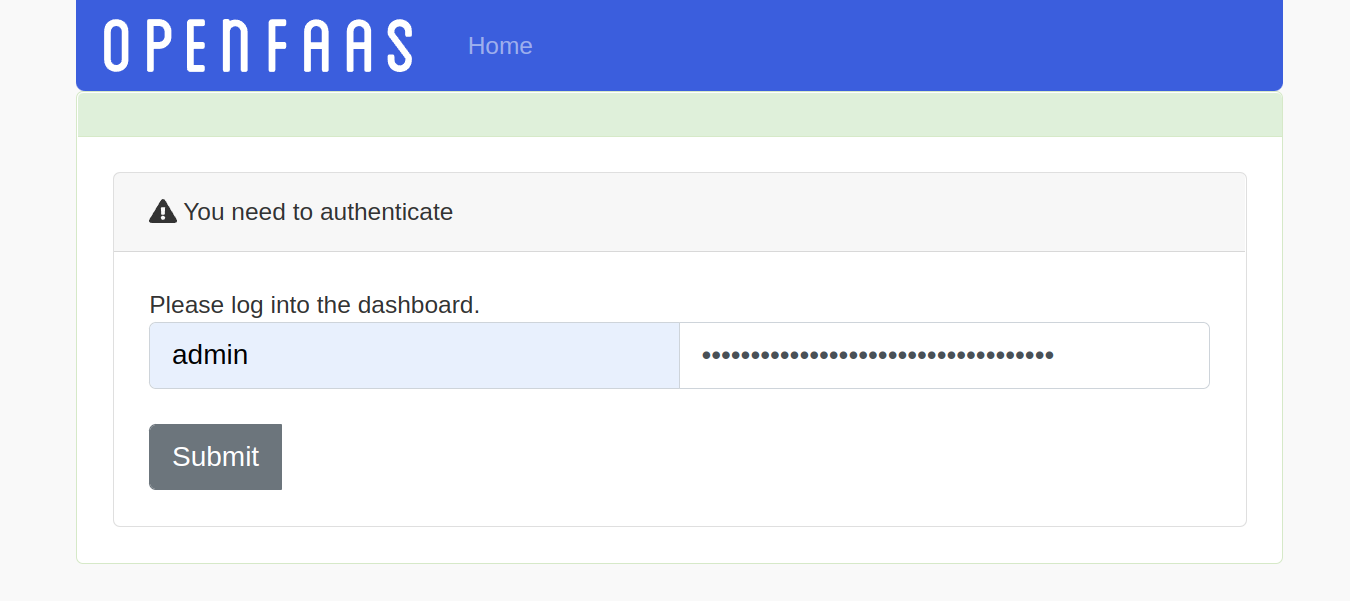
Login to the dashboard
Once logged in, you'll be met by the namespace selector. Namespaces can be used to group functions together, or to provide a level of isolation between teams using the same OpenFaaS installation.
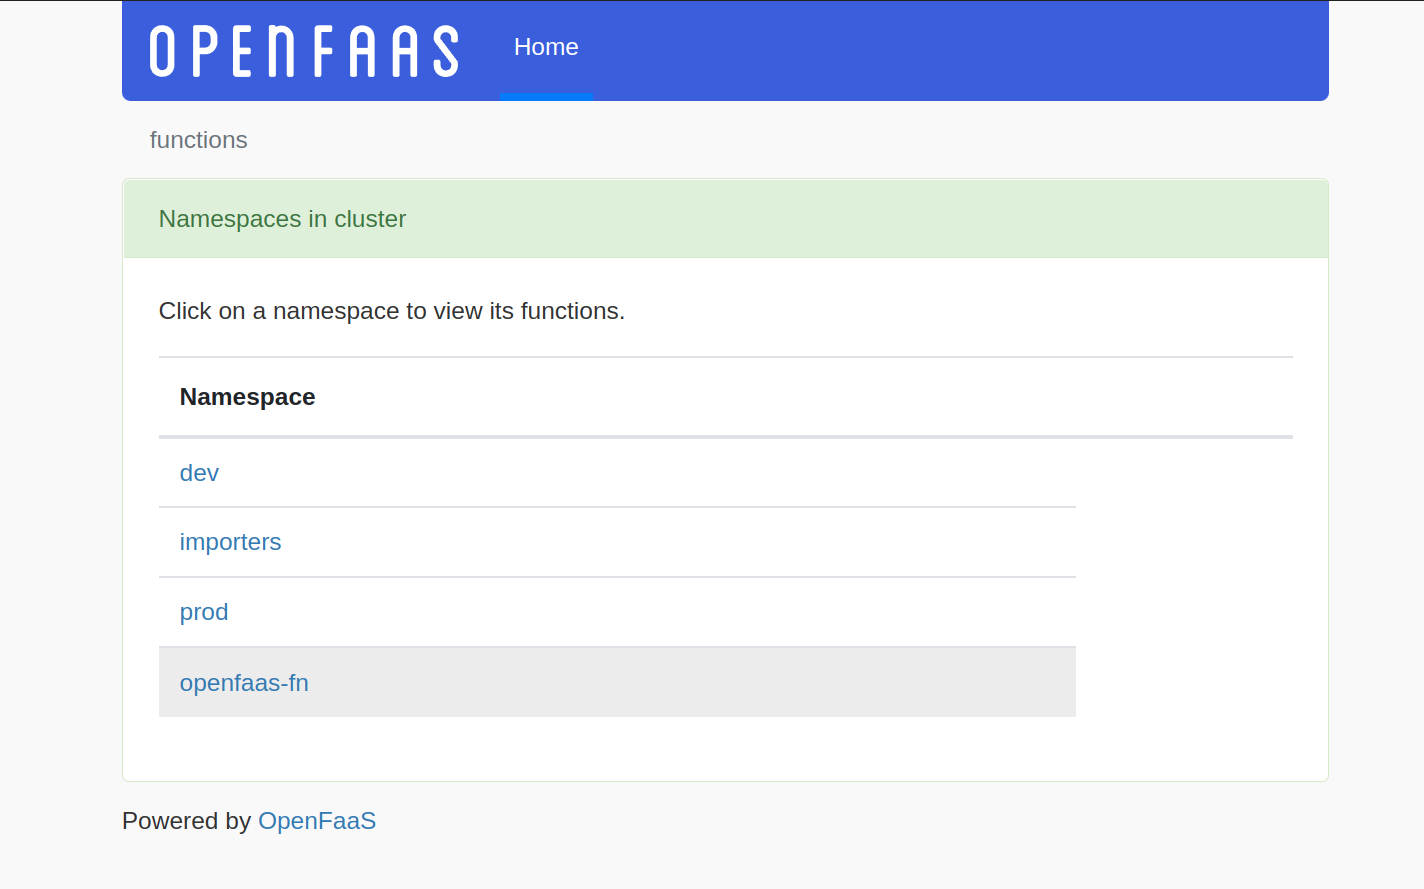
Select a namespace to explore
See also: Namespace support
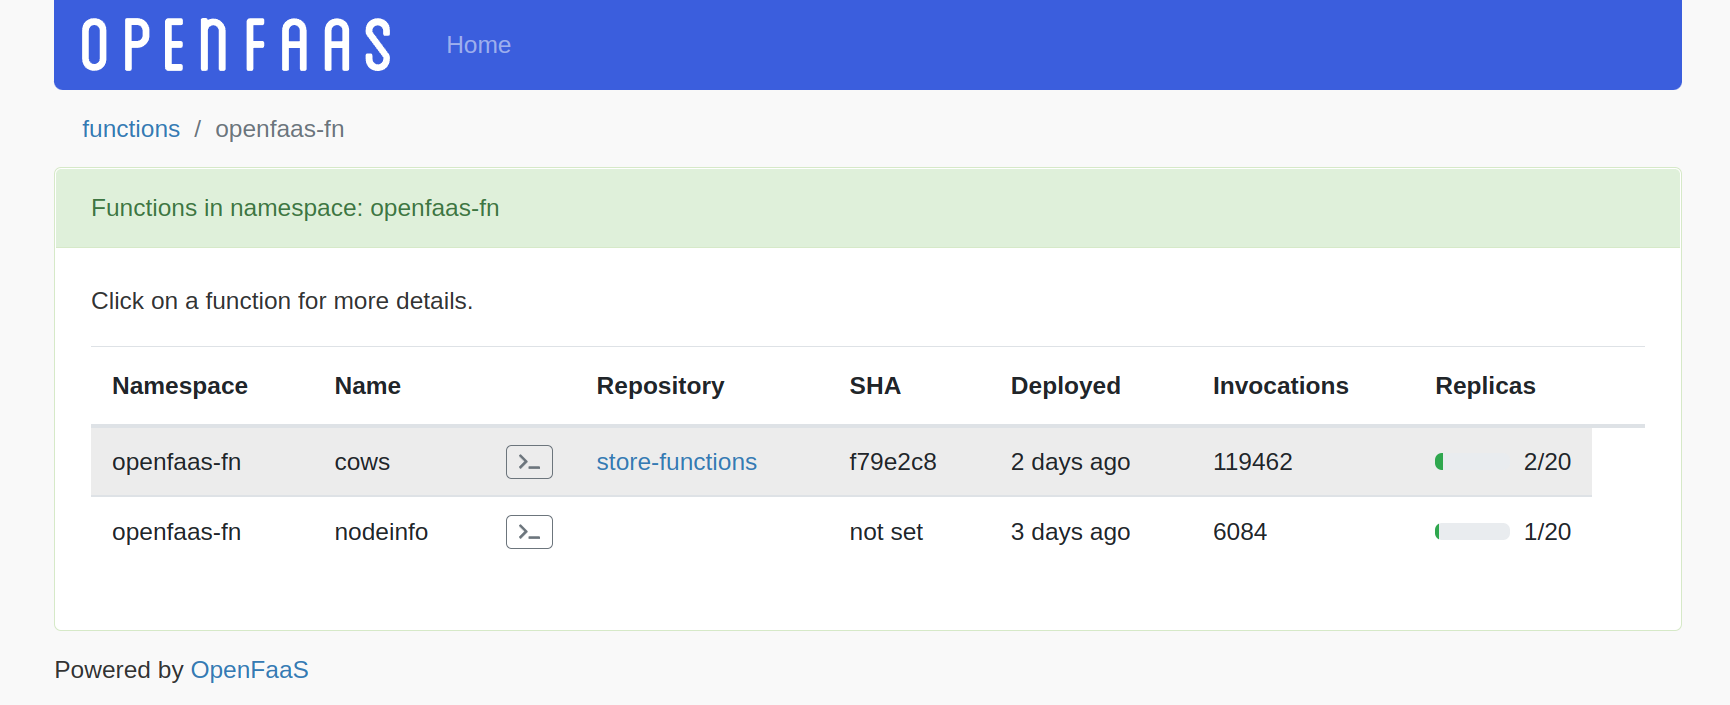
An overview of functions
Note that the fields such as repository and SHA can be populated at deploy time and integrate into the UI to create links and show you what's deployed.

View the details for a function, including metrics, logs and metadata about its deployment
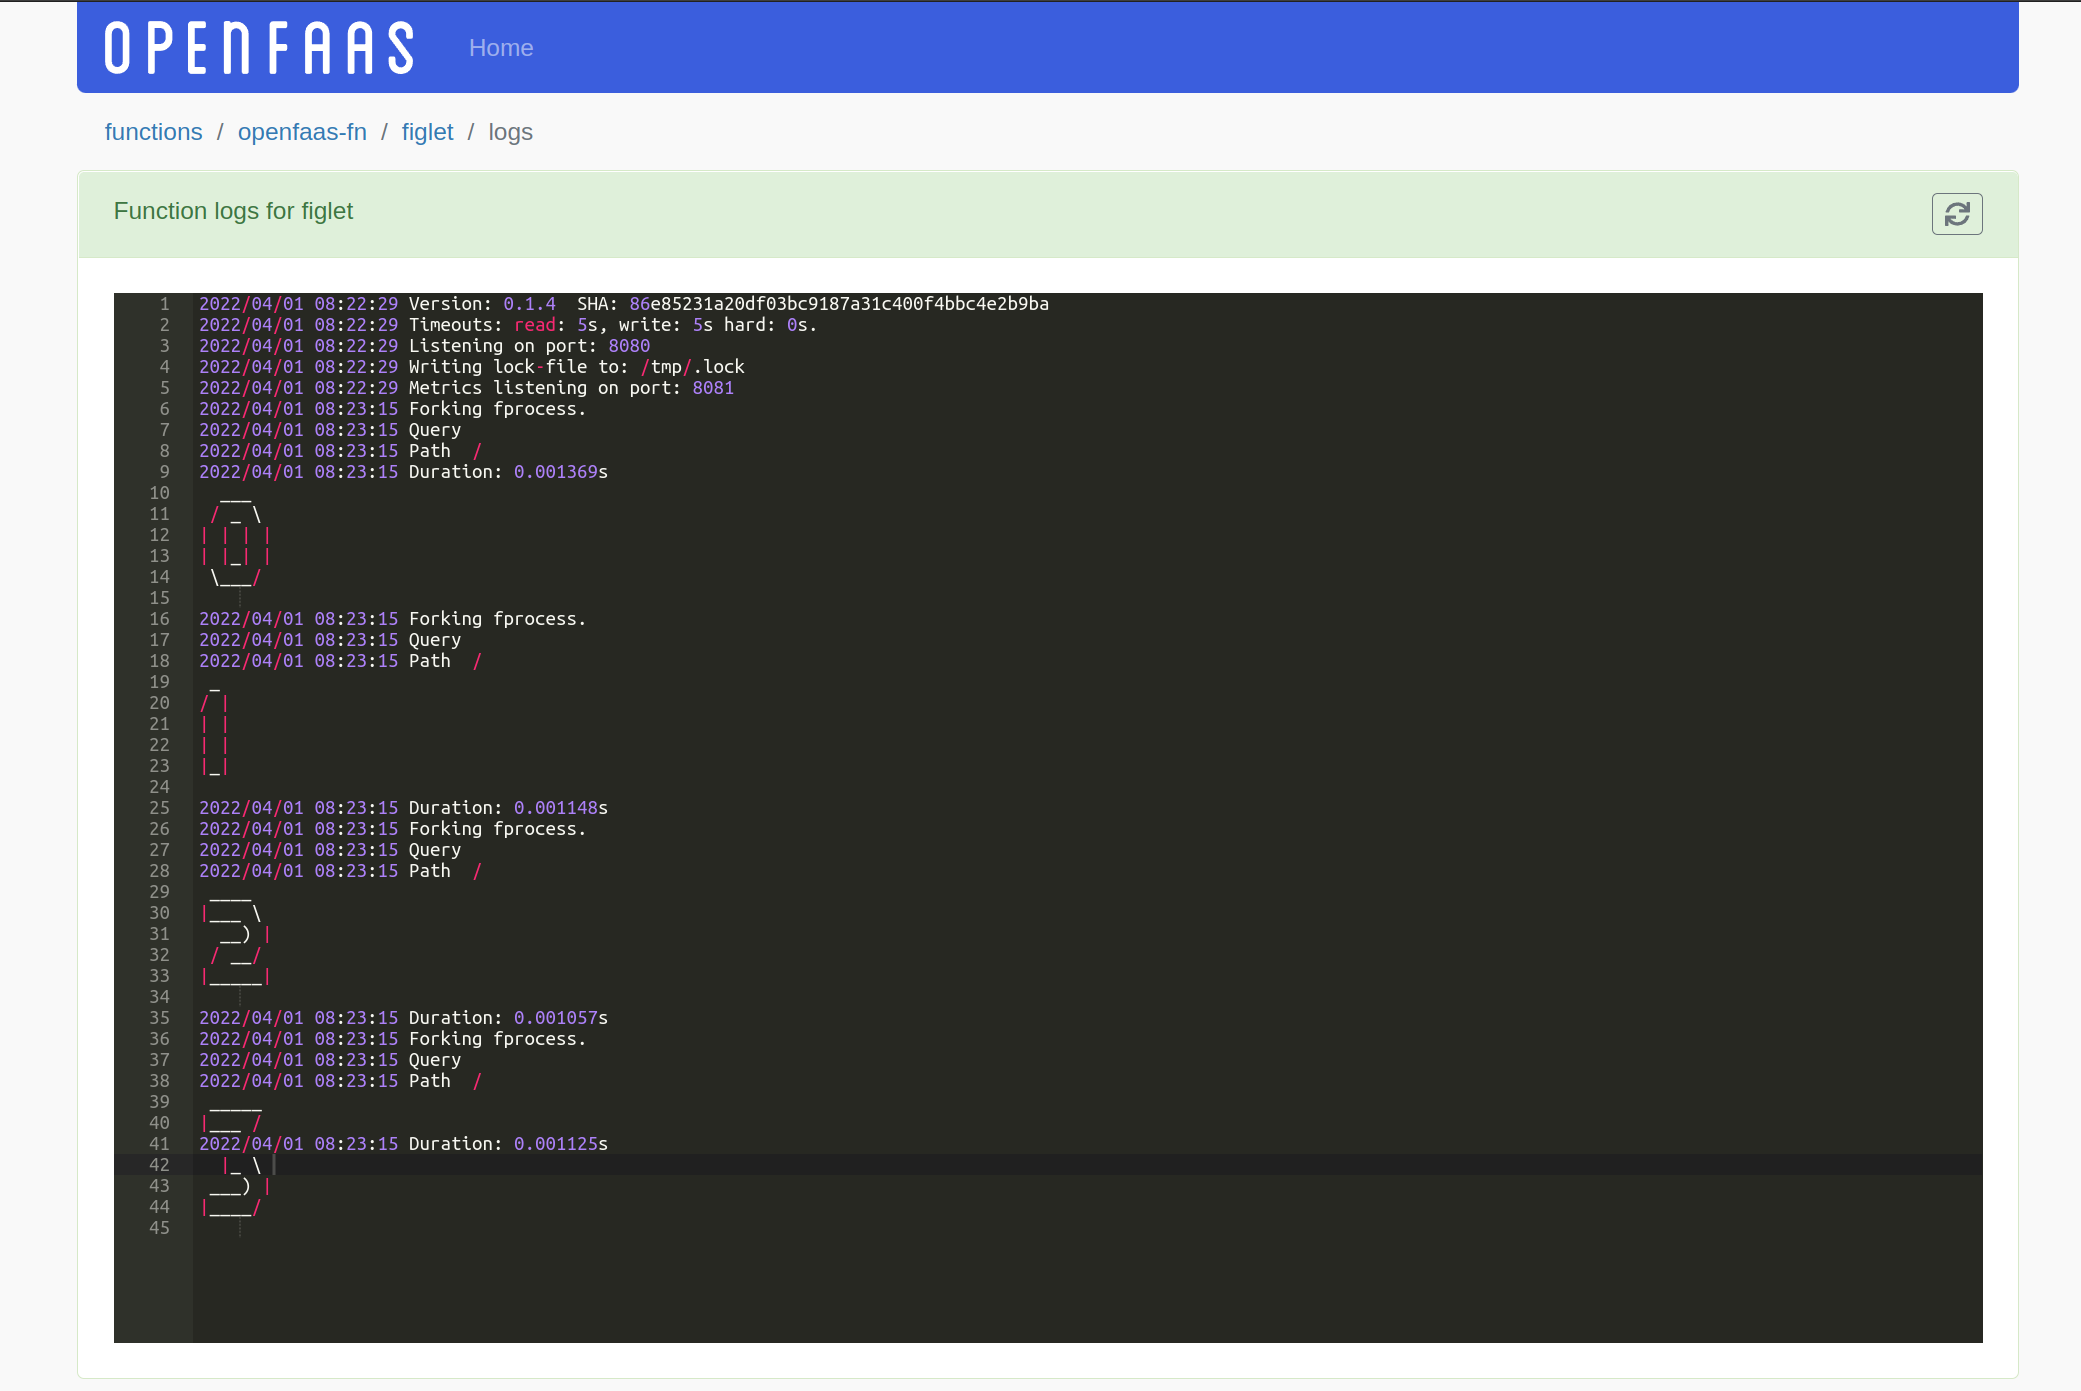
The logs of the figlet function, viewed without
kubectlor needing separate terminal access.
faas-cli store deploy \
    figlet \
    --gateway https://of-pro.example.com \
    --env write_debug=true \
    --env read_debug=true
for i in {0..3}; do curl https://of-pro.example.com/function/figlet -d $i ; done
To populate the metadata in the UI, simply set the following at deployment time via faas-cli deploy or the OpenFaaS Custom Resource:
| Type | Key | Example value |
|---|---|---|
| label | com.openfaas.git-branch |
master |
| label | com.openfaas.git-owner |
openfaas |
| annotation | com.openfaas.git-repo-url |
https://github.com/openfaas/store-functions |
| label | com.openfaas.git-repo |
store-functions |
| label | com.openfaas.git-sha |
665d9597547d8e0425630ba2dbb73c2951a61ce2 |
Here's an example:
faas-cli store deploy cows \
  --label com.openfaas.scale.min=2 \
  --annotation com.openfaas.git-repo-url=https://github.com/openfaas/store-functions \
  --label com.openfaas.git-owner=openfaas \
  --label com.openfaas.git-repo=store-functions \
  --label com.openfaas.git-branch=master \
  --label com.openfaas.git-sha=f79e2c86e8d67f747d1e449ba6ca63eb5858e5bb
Any of these fields can be replaced through environment substitution in stack.yml or using helm during CI/CD.
Example snippet from stack.yml:
functions:
  cows:
    lang: golang-middleware
    handler: ./cows
    image: alexellis2/cows:0.1
    labels:
      com.openfaas.git-sha: ${GIT_SHA:-dev}
Then using environment variables from your CI system such as GitHub Actions or GitLab CI, override any variables you want to change.
Example of injecting the SHA from Gitlab:
GIT_SHA=$CI_COMMIT_SHA faas-cli deploy
Example with GitHub Actions:
GIT_SHA=$GITHUB_SHA faas-cli deploy
When the GIT_SHA variable is omitted, then the text dev will be inputted instead.
See also:
- GitLab CI Environment variables
- GitHub Actions Environment variables
- Environment substitution in stack.yml
Installation
The OpenFaaS Dashboard is installed through the openfaas helm chart, and will also work with faasd.
Before deploying, you'll need to have created a secret for your license, you'll find instruction in the helm chart for this.
Create a signing key
You need to create a JWT signing key and a separate secret for the dashboard. It's used to sign and validate logged in sessions.
# Generate a private key
openssl ecparam -genkey -name prime256v1 -noout -out jwt_key

# Then create a public key from the private key
openssl ec -in jwt_key -pubout -out jwt_key.pub

# Store both in a secret in the openfaas namespace
kubectl -n openfaas \
  create secret generic dashboard-jwt \
  --from-file=key=./jwt_key \
  --from-file=key.pub=./jwt_key.pub
Note
For easy deployment during development this step can be skipped. The dashboard will automatically create the required signing keys on startup.
Note that these keys will be recreated any time the dashboard container is restarted invalidating any logged in sessions.
Configure the dashboard
To enable the dashboard feature, add the following to your values.yaml file for the openfaas chart:
dashboard:
  enabled: true
  publicURL: https://dashboard.example.com
  # Name of signing key secret for sessions.
  # Can be left blank for development deployments.
  signingKeySecret: "dashboard-jwt"
The publicURL, doesn't necessarily have to be publicly exposed on the Internet, but it does need to be a fully qualified domain name (FQDN).
The signingKeySecret can be left blank to auto generate signing keys (See: Create a signing key).
Configure the dashboard with IAM
If you have enabled Identity and Access Management (IAM) for OpenFaaS authentication to the dashboard happens via OpenID Connect(OIDC). This requires a few extra configuration steps.
-
Configure an OIDC provider.
If you have already configured your OIDC provider and registered it with OpenFaaS this step can be skipped. If you did not configure any providers see: Single Sign-On (SSO) for the OpenFaaS CLI and dashboard
-
Generate AES encryption key
An AES encryption key needs to be generated and stored in secret in the openfaas namespace. This AES key is used to encrypt the OpenFaaS access token.
# Generate a key openssl rand -hex 16 > aes_key # Store the key in a secret in the openfaas namespace kubectl -n openfaas \ create secret generic aes-key \ --from-file=aes_key=./aes_key -
Create a Kubernetes secret for the OAuth client secret
This step can be skipped if the issuer used for the dashboard does not need a client secret. Retrieve the client secret from your identity provider and store it a file
client_secret.kubectl create secret generic \ -n openfaas \ oauth-client-secret \ --from-file client_secret=./client_secret -
Configure the OpenFaaS deployment
Add the following to
iamsection in your values.yaml file for the openfaas chart:iam: dashboardIssuer: # URL if the issuer url: "https://example.auth0.com" clientId: "" # Name of Kubernetes secret containing the client secret. # Can be left blank if a client secret is not required e.g for the PKCE flow. clientSecret: "oauth-client-secret" scopes: - openid - profile - emailThe clientSecret can be left blank if your OIDC provider does not require a secret.
Depending on your provider and setup you might need to request additional scopes. These can be set through the
scopesparameter.Custom certificate bundle
When using an internal certificate authority or self-signed TLS certificates for the OpenFaaS gateway or your identity provider, the dashboard will needs a custom CA bundle for making HTTP requests to these components.
-
Create an IAM policy for dashboard users
Users that need to access the dashboard require a minimum set of IAM permissions. Without these permissions the user will not be able to list namespaces or view functions through the dashboard.
The minimal policy for dashboard access requires the following actions:
Namespace:List- Required to list and select namespaces in the dashboard.Function:List- Required to list functions within a namespace.Function:Get- Required to view function details and metrics.Function:Logs- Required to view function logs.
Example Policy for read-only dashboard access:
apiVersion: iam.openfaas.com/v1
kind: Policy
metadata:
  name: dashboard-readonly
  namespace: openfaas
spec:
  statement:
  - sid: dashboard-ro
    action:
    - Namespace:List
    - Function:List
    - Function:Get
    - Function:Logs
    effect: Allow
    resource: ["*"]
This policy can be scoped to specific namespaces if needed. For example, to restrict a user to only view functions in the
devnamespace:resource: ["dev:*"]For users that need more than read-only access, the following actions can be added to the policy:
Function:Invoke- Allows users to invoke functions that have Function Authentication enabled.Function:Delete- Allows users to delete functions through the dashboard.
Since these are write-level permissions, they could also be added to a separate policy and only granted to users who need them.
Assign the policies to any Role that requires access to the dashboard.
Access your dashboard via port-forwarding
If you don't want to expose your dashboard to users over the Internet, then you can access it as and when required using port-forwarding. Instead of giving a domain and DNS record, you can set the public url in your values.yaml file to localhost or an empty string.
dashboard:
  enabled: true
  publicURL: "localhost"
To access the dashboard run the following, whenever you need it:
kubectl port-forward \
  -n openfaas \
  service/dashboard 8081:8080
The username is admin and the password is the same one used for faas-cli login.
Then access the URL via http://127.0.0.1:8081
Expose your dashboard on the Internet
The Helm chart has instructions for exposing both the gateway and the dashboard over the Internet using Let's Encrypt and cert-manager. You can also create your your custom Ingress record or Istio Gateway, the dashboard is available at http://dashboard.openfaas:8080 within the cluster.
See also: TLS for OpenFaaS
Access OpenFaaS over TLS from your local machine
When working locally, you will not have a public IP address available. You can use an inlets tunnel to access your OpenFaaS gateway and dashboard over TLS.
Set up the tunnel using these steps: inlets automated HTTP server, then apply the below YAML for the tunnel client, to expose both the gateway and the dashboard.
- Edit the
token,license, andurlfields as per the output from link above. - Then update the values for
upstreamto match the domain names you're using for the gateway and dashboard, make sure you've created DNS A or CNAME records to point to the tunnel server.
apiVersion: apps/v1
kind: Deployment
metadata:
  name: inlets-dashboard-client
  namespace: openfaas
spec:
  replicas: 1
  selector:
    matchLabels:
      app: inlets-dashboard-client
  template:
    metadata:
      labels:
        app: inlets-dashboard-client
    spec:
      containers:
      - name: inlets-dashboard-client
        image: ghcr.io/inlets/inlets-pro:0.9.3
        imagePullPolicy: IfNotPresent
        command: ["inlets-pro"]
        args:
        - "http"
        - "client"
        - "--url=wss://EXIT_SERVER_IP"
        - "--token="
        - "--license="
        - "--upstream=dashboard.example.com=http://dashboard.openfaas:8080"
        - "--upstream=gateway.example.com=http://gateway.openfaas:8080"
You can use the same tunnel and exit server for multiple domains, to expose both the gateway and the dashboard with TLS and authentication.
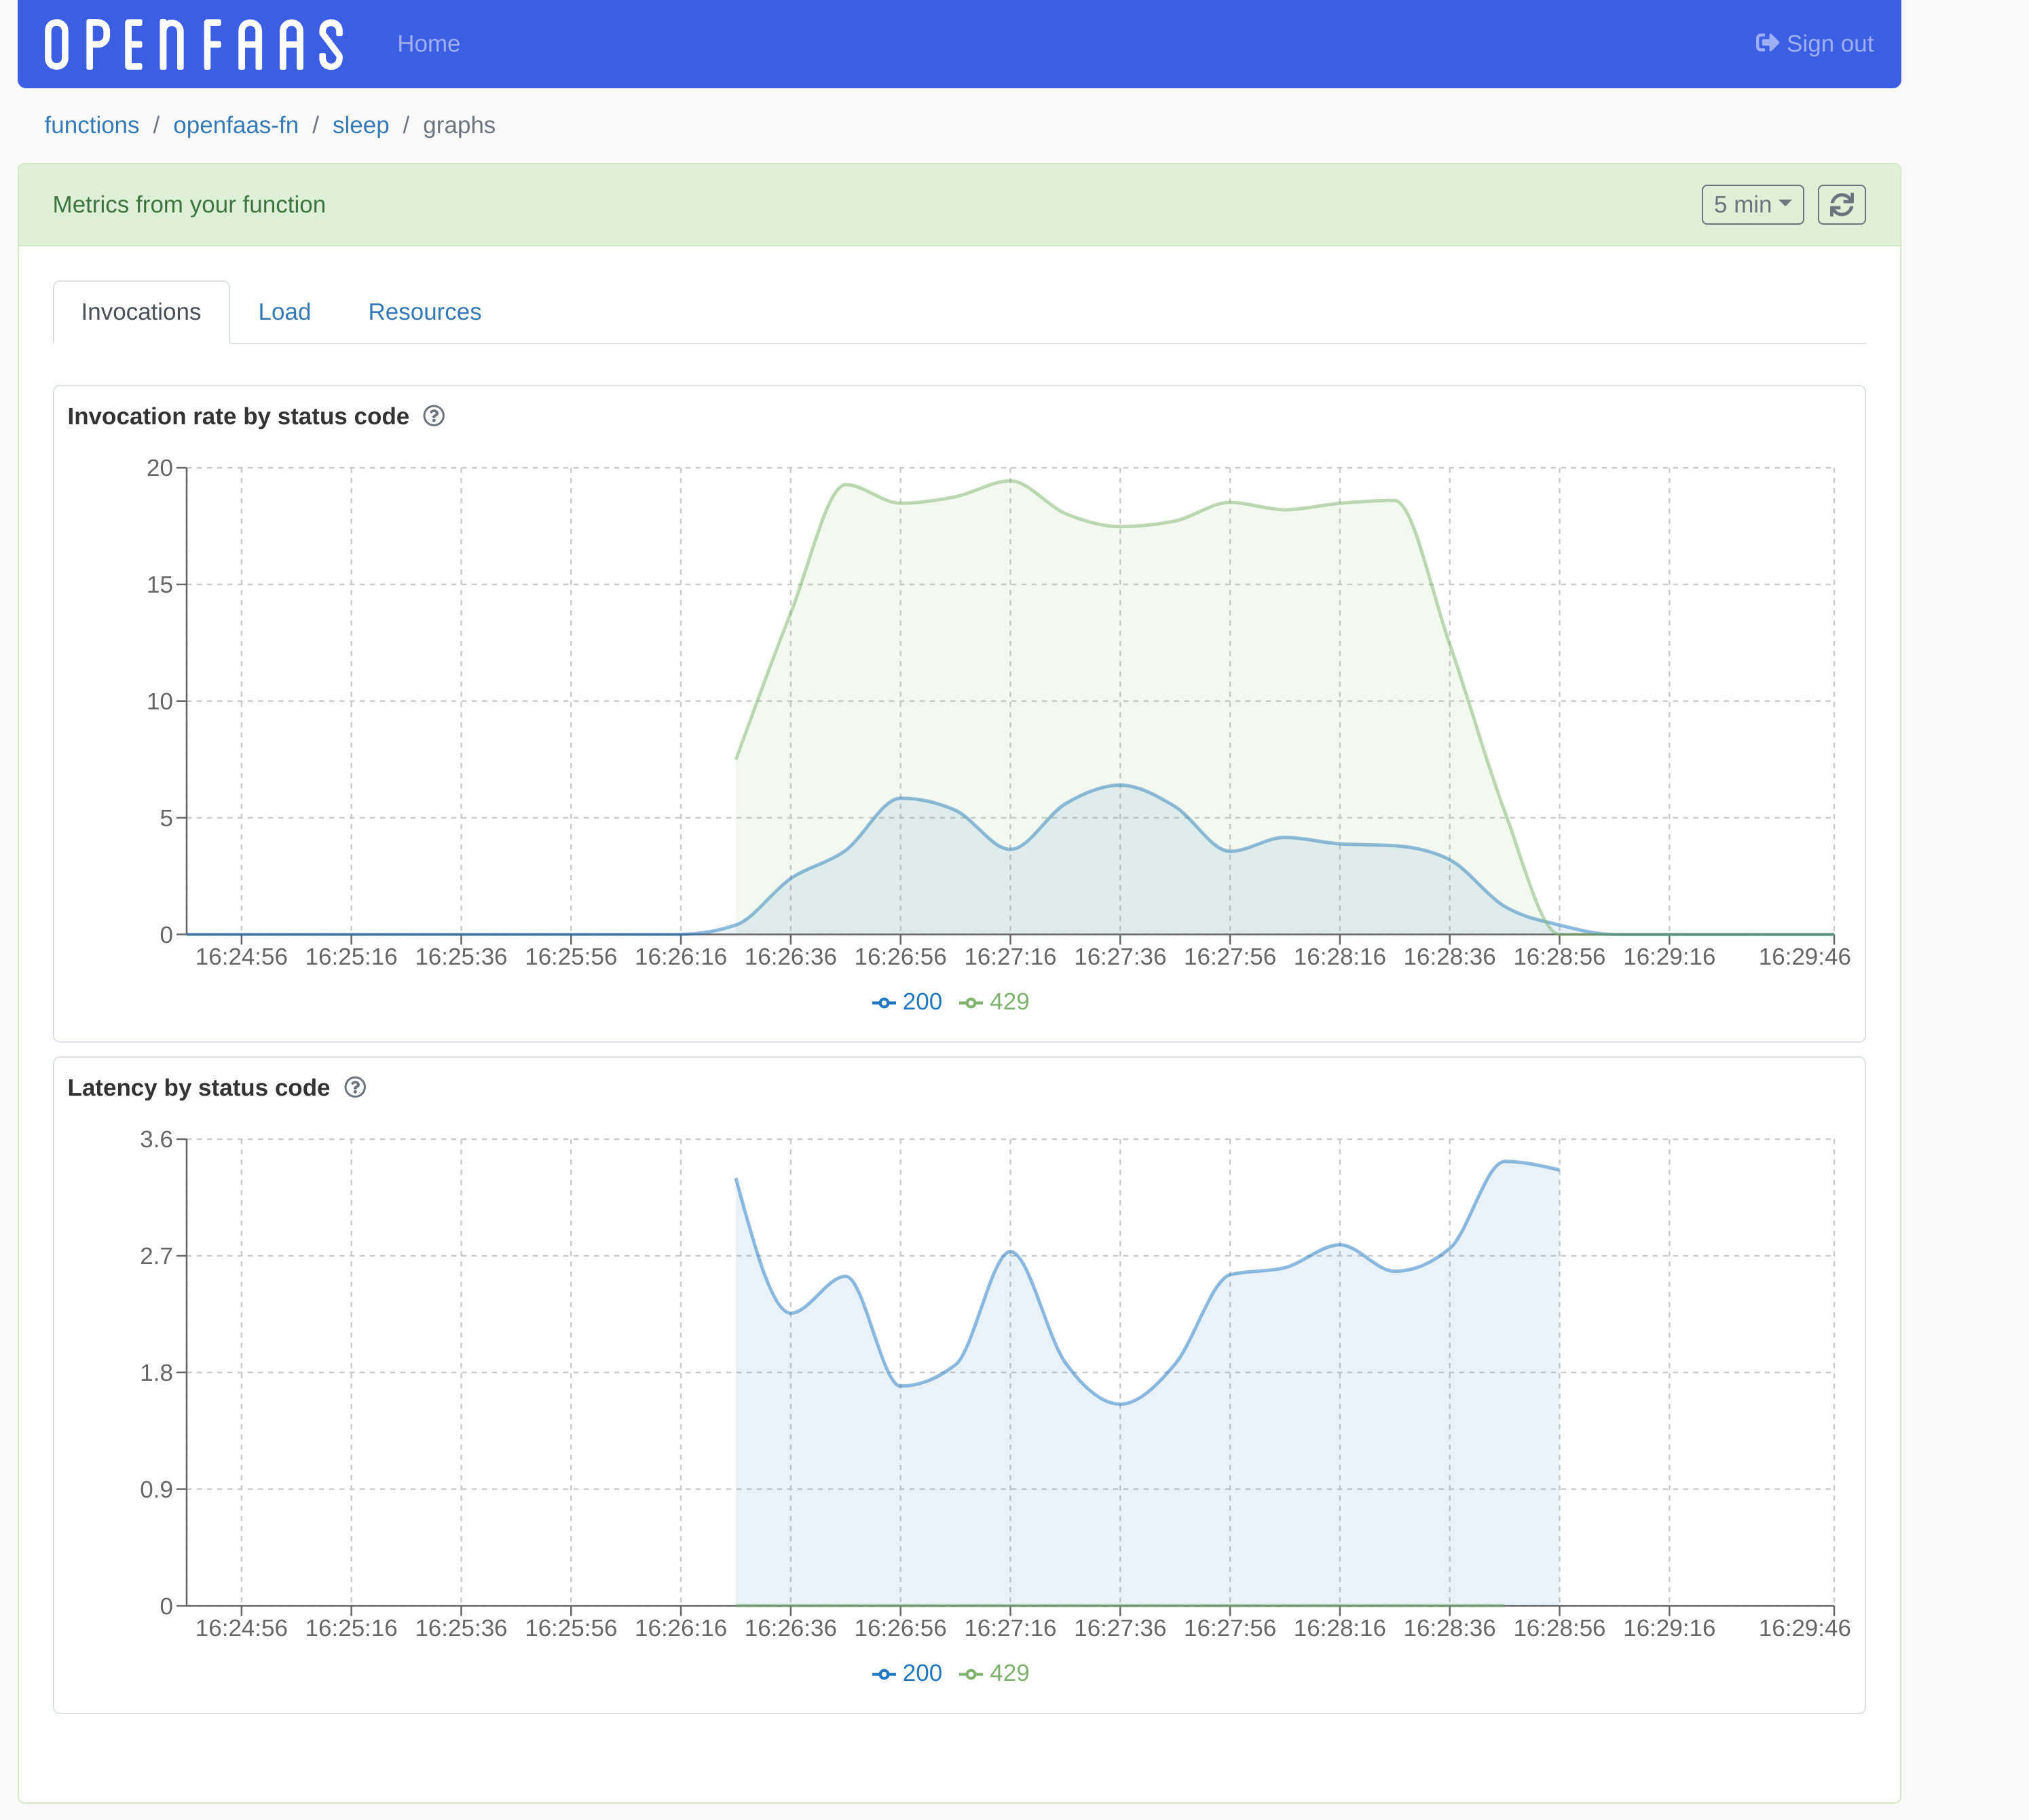
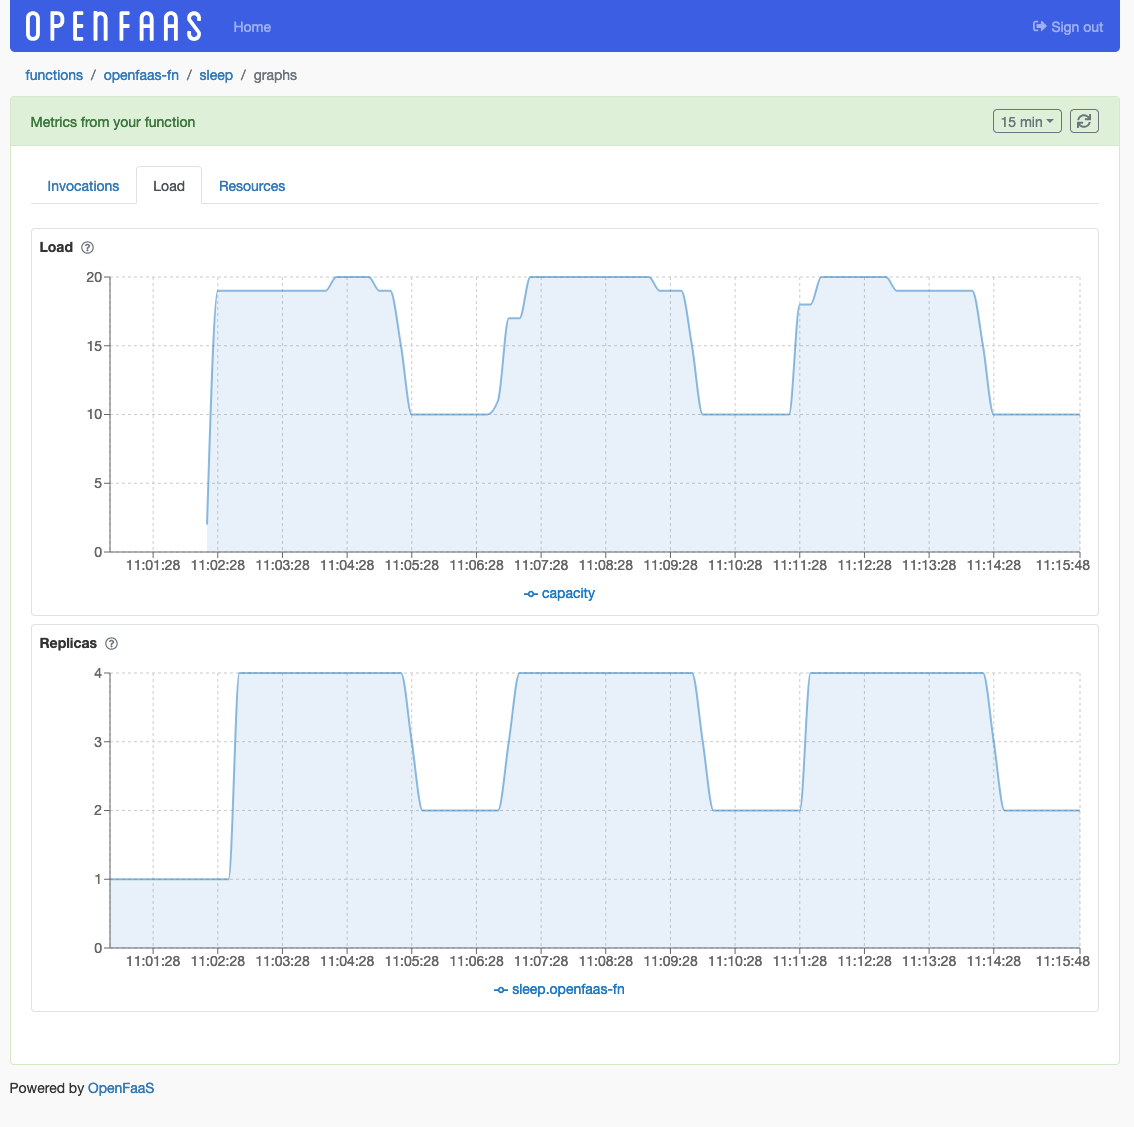
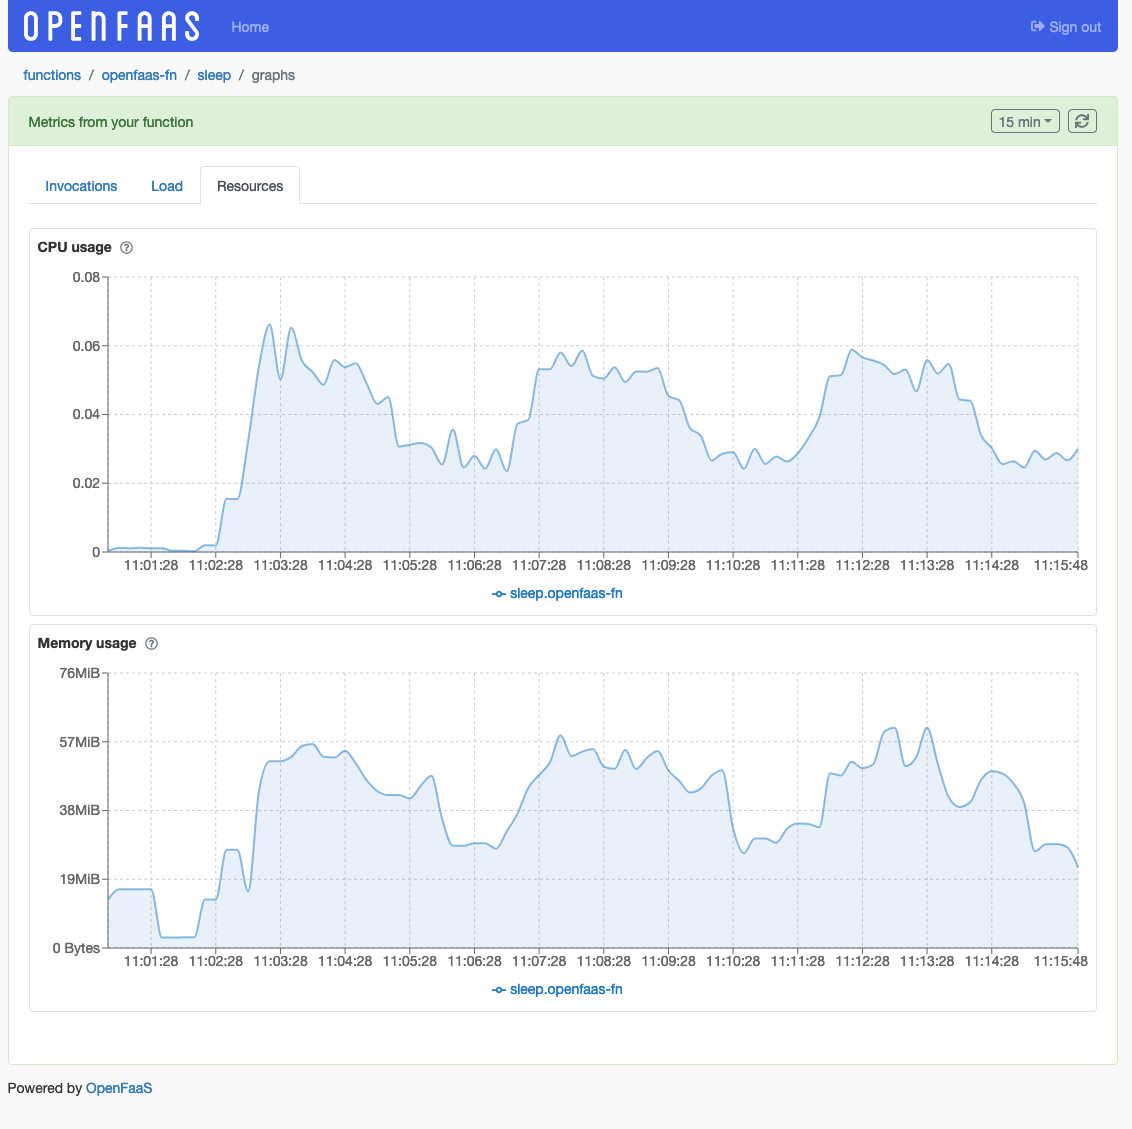
Graphs
Note
Available in ghcr.io/openfaasltd/openfaas-dashboard:0.5.26 or later.
The OpenFaaS dashboard comes with built-in graphs to give you better visibility into function behavior and resource utilization, making it easier to debug and optimize your workloads.
It provides detailed metrics for individual functions, including:
Invocation metrics
Rate, Error, Duration (RED) metrics.
Invocation rate by status code- Function invocation rate over the last 30s broken down by status code.Latency by status code- Average function invocation latency over the last 30s broken down by status code.
Load metrics
View function replica count and current load.
Load- Load as measured by the autoscaler.Replicas- Function replica count.
Resource usage
CPU/RAM usage of functions.
CPU usage- CPU usage of the function across all replicas, measured in milli-CPU.Memory usage- Memory usage of the function across all replicas.
Would you like a demo?
Feel free to reach out to us for a demo or to ask any questions you may have.