Bitbucket - Web Identity Federation
In this guide, you'll learn how to deploy from Bitbucket Pipelines using OpenFaaS's IAM support and Web Identity Federation.
You'll need to create YAML files for an Issuer, a Policy and a Role. These need to be applied through kubectl, Helm or a GitOps tool.
Your build will need to be adapted in order to receive an id_token from Bitbucket, which will be exchanged for an OpenFaaS access token.
Pre-requisites
OIDC identity provider
You need to retrieve your workspace's OIDC identity provider URL and audience from Bitbucket:
- Navigate to your repository in Bitbucket Cloud.
- Select Repository settings on the left navigation sidebar.
- Select OpenID Connect under Pipelines on the left sidebar.
- Copy the Identity provider URL and Audience values.
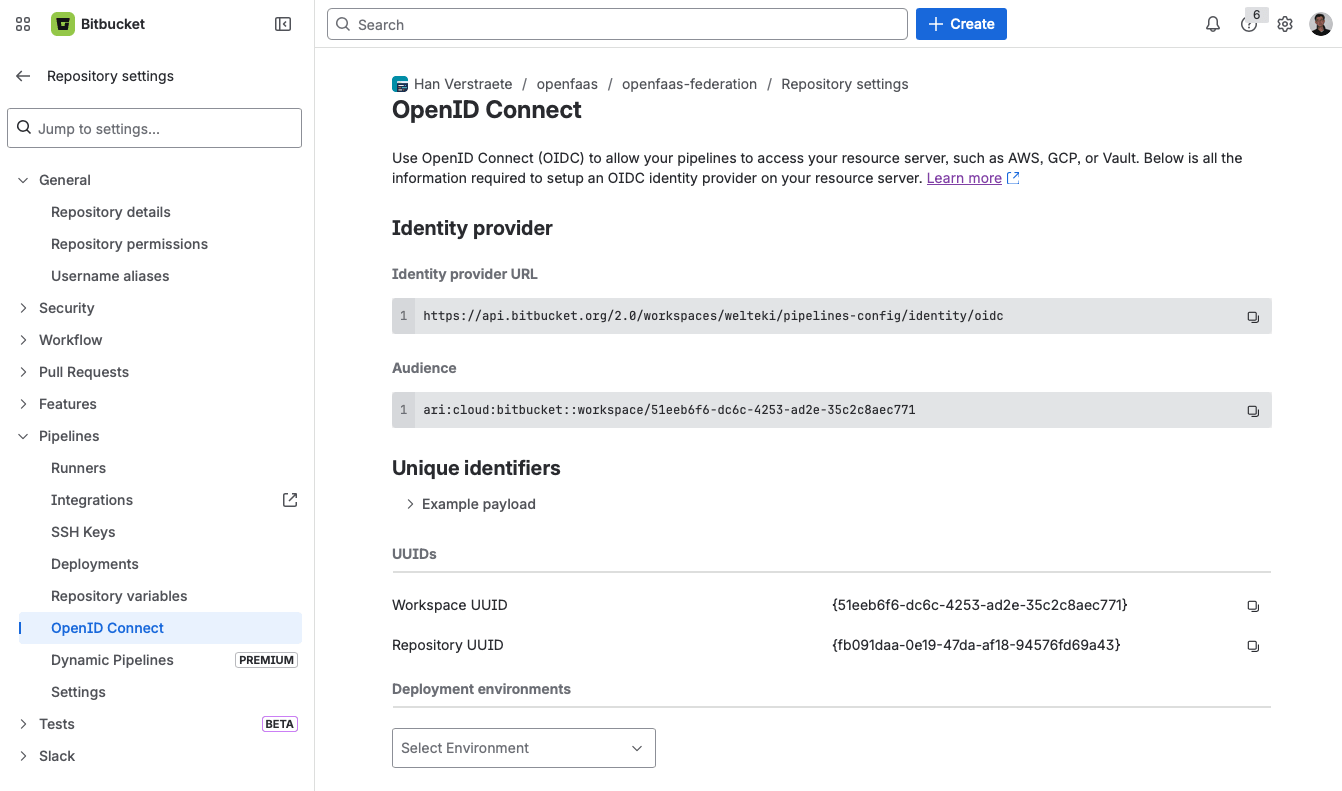
You'll need both values when configuring the JwtIssuer resource below.
See also: Integrate Pipelines with resource servers using OIDC
faas-cli pro license
The faas-cli pro plugin requires a valid CLI license. The plugin looks for the license in the OPENFAAS_LICENSE environment variable.
Add OPENFAAS_LICENSE as a repository variable under Repository settings > Pipelines > Repository variables, or as a workspace variable under Workspace settings > Pipelines > Workspace variables. Mark it as Secured so its value is masked in build logs. Workspace and repository variables are automatically available as environment variables in all pipeline steps.
If you don't have a CLI license yet, contact your account representative at OpenFaaS to receive one.
Define an Issuer for Bitbucket
First define a new JwtIssuer resource, setting the iss field to the Identity provider URL retrieved from your workspace's OIDC settings. Set the aud field to the URL of your OpenFaaS gateway.
apiVersion: iam.openfaas.com/v1
kind: JwtIssuer
metadata:
  name: bitbucket.com
  namespace: openfaas
spec:
  iss: https://api.bitbucket.org/2.0/workspaces/WORKSPACE/pipelines-config/identity/oidc
  aud:
  - https://gw.example.com
  tokenExpiry: 30m
Replace WORKSPACE with the name of your Bitbucket workspace.
The tokenExpiry field controls how long the OpenFaaS access token is valid. A short expiry such as 30m is recommended to reduce the window in which a leaked token could be used, but it can be increased for longer-running CI jobs.
The aud field must match the custom audience configured in your Bitbucket pipeline. By adding the gateway URL as a custom audience in the pipeline step, it is included in the token's aud claim so that OpenFaaS can validate the token.
If you have repositories across multiple workspaces that need to access OpenFaaS, you will need to create a separate issuer for each workspace.
Apply the Issuer with kubectl apply.
Bitbucket OIDC token claims
IAM Roles and Policies support conditions to restrict access based on claims from the Bitbucket OIDC token. For example, you can limit a Role so it only applies to a specific repository or branch by matching the repositoryUuid or branchName claims. Here is an overview of the claims available within a Bitbucket Pipelines id_token:
{
  "sub": "{repositoryUuid}:{stepUuid}",
  "stepUuid": "{xxxxxxx-xxxx-xxxx-xxxx-xxxxxxxxxx}",
  "iss": "https://api.bitbucket.org/2.0/workspaces/WORKSPACE/pipelines-config/identity/oidc",
  "branchName": "xxxxxxxxx",
  "workspaceUuid": "{xxxxxxx-xxxx-xxxx-xxxx-xxxxxxxxxx}",
  "pipelineRunUuid": "{xxxxx-xxxxx-xxxx-xxxx-xxxxxxxxxxx}",
  "aud": [
    "ari:cloud:bitbucket::workspace/WORKSPACE",
    "https://gw.example.com"
  ],
  "repositoryUuid": "{xxxxxxx-xxxx-xxxx-xxxx-xxxxxxxxxx}",
  "exp": "xxxxxxxxxx",
  "iat": "xxxxxxxxxx",
  "pipelineUuid": "{xxxxx-xxxxx-xxxx-xxxx-xxxxxxxxxxx}"
}
You can view the example payload for your repository on the OpenID Connect page under Repository settings > Pipelines in Bitbucket Cloud.
When a custom audience is configured in the pipeline, it will appear alongside the default workspace audience in the aud array.
Custom audience
By default, the Bitbucket OIDC token only includes the workspace audience (e.g. ari:cloud:bitbucket::workspace/WORKSPACE_UUID). We recommend adding the OpenFaaS gateway URL as a custom audience. This is done by adding an oidc block with an audiences list to your pipeline step. The custom audience is appended to the default workspace audience in the token's aud claim.
oidc:
  audiences:
    - https://gw.example.com
When setting a custom audience in the pipeline, the aud field in the JwtIssuer resource must be set to the same gateway URL so that OpenFaaS can validate the token.
You can set custom audiences at the step level or globally using options. See the Bitbucket documentation for more details.
Deploy functions to a specific namespace
In this example, a pipeline deploys or updates functions in the etl namespace. The Policy grants deploy, and update permissions for any function within that namespace, and the Role locks it down to a specific repository and branch.
This example covers only the deploy step. Functions must be built and pushed to a registry before they can be deployed. See CI/CD with Bitbucket Pipelines for an example on how to set up the build and push steps.
Create a Policy
The etl-deployer policy grants permission to create or update any function within etl:
apiVersion: iam.openfaas.com/v1
kind: Policy
metadata:
  name: etl-deployer
  namespace: openfaas
spec:
  statement:
  - sid: 1-rw-etl
    action:
    - Function:Create
    - Function:Update
    effect: Allow
    resource: ["etl:*"]
Bind the Policy to a Role
Create a Role that binds the etl-deployer policy and uses conditions to restrict access to a specific repository and branch:
apiVersion: iam.openfaas.com/v1
kind: Role
metadata:
  name: etl-ci-deployer
  namespace: openfaas
spec:
  policy:
  - etl-deployer
  condition:
    StringEqual:
      jwt:iss: ["https://api.bitbucket.org/2.0/workspaces/WORKSPACE/pipelines-config/identity/oidc"]
      jwt:repositoryUuid: ["{REPO_UUID}"]
      jwt:branchName: ["main"]
Replace WORKSPACE with your Bitbucket workspace name and {REPO_UUID} with the UUID of the repository. The example restricts deployments to the main branch. You could restrict this further by matching additional claims such as workspaceUuid or pipelineUuid.
Apply the Policy and Role with kubectl apply.
Create the pipeline
Create a bitbucket-pipelines.yml file in the root of your repository:
image: atlassian/default-image:3

pipelines:
  default:
    - step:
        name: Deploy to OpenFaaS
        oidc:
          audiences:
            - https://gw.example.com
        script:
          - export OPENFAAS_URL="https://gw.example.com"

          # Install faas-cli and the pro plugin
          - curl -sLS https://cli.openfaas.com | sh
          - faas-cli plugin get pro

          # Exchange the Bitbucket OIDC token for an OpenFaaS access token
          - faas-cli pro auth --token=$BITBUCKET_STEP_OIDC_TOKEN

          # Deploy functions defined in stack.yml
          - faas-cli template pull stack
          - faas-cli deploy --tag=sha
The pipeline assumes a stack.yml file exists in the repository root defining the functions to deploy. In this example we are using the stack.yaml from CI/CD with Bitbucket Pipelines. Add a namespace field to each function so it is deployed into the namespace allowed by the policy:
 functions:
   import-csv:
+    namespace: etl
     lang: python3-http
The oidc.audiences field adds the OpenFaaS gateway URL as a custom audience to the OIDC token. Bitbucket makes the token available through the BITBUCKET_STEP_OIDC_TOKEN environment variable when oidc is configured on the step.
The faas-cli pro plugin exchanges the Bitbucket OIDC token for an OpenFaaS access token and saves it. After that, faas-cli can be used to deploy functions to the gateway.
Invoke an authenticated function
In this example, a pipeline invokes a single function called import-csv in the etl namespace. The Policy restricts access to only invoking that function, and the Role ensures only a specific repository and branch can use it.
Note that the function must have authentication enabled. See Function Authentication for how to enable it.
Create a Policy
The etl-invoker policy restricts access to invoking a single function by name:
apiVersion: iam.openfaas.com/v1
kind: Policy
metadata:
  name: etl-invoker
  namespace: openfaas
spec:
  statement:
  - sid: 1-invoke-etl
    action:
    - Function:Invoke
    effect: Allow
    resource: ["etl:import-csv"]
The resource list can be expanded to allow invoking multiple functions:
resource: ["etl:import-csv", "etl:transform-data", "etl:export-report"]
Or use a wildcard to allow invoking any function in the namespace:
resource: ["etl:*"]
Bind the Policy to a Role
Create a Role that binds the etl-invoker policy and uses conditions to restrict access to a specific repository and branch:
apiVersion: iam.openfaas.com/v1
kind: Role
metadata:
  name: etl-ci-invoker
  namespace: openfaas
spec:
  policy:
  - etl-invoker
  condition:
    StringEqual:
      jwt:iss: ["https://api.bitbucket.org/2.0/workspaces/WORKSPACE/pipelines-config/identity/oidc"]
      jwt:repositoryUuid: ["{REPO_UUID}"]
      jwt:branchName: ["main"]
Replace WORKSPACE with your Bitbucket workspace name and {REPO_UUID} with the UUID of the repository. The example restricts invocations to the main branch. You could restrict this further by matching additional claims such as workspaceUuid or pipelineUuid.
Apply the Policy and Role with kubectl apply.
Create the pipeline
Create a bitbucket-pipelines.yml file in the root of your repository:
image: atlassian/default-image:3

pipelines:
  default:
    - step:
        name: Invoke function
        oidc:
          audiences:
            - https://gw.example.com
        script:
          - export OPENFAAS_URL="https://gw.example.com"

          # Install faas-cli and the pro plugin
          - curl -sLS https://cli.openfaas.com | sh
          - faas-cli plugin get pro

          # Exchange the Bitbucket OIDC token for an OpenFaaS access token
          - faas-cli pro auth --token=$BITBUCKET_STEP_OIDC_TOKEN

          # Invoke the function with a sample CSV payload
          - >-
            printf 'name,email\nalice,alice@example.com\nbob,bob@example.com\n'
            > data.csv
          - faas-cli invoke -n etl import-csv < data.csv
The oidc.audiences field adds the OpenFaaS gateway URL as a custom audience to the OIDC token. Bitbucket makes the token available through the BITBUCKET_STEP_OIDC_TOKEN environment variable when oidc is configured on the step.
The faas-cli pro plugin exchanges the Bitbucket OIDC token for an OpenFaaS access token and saves it. After that, faas-cli can be used to invoke functions.